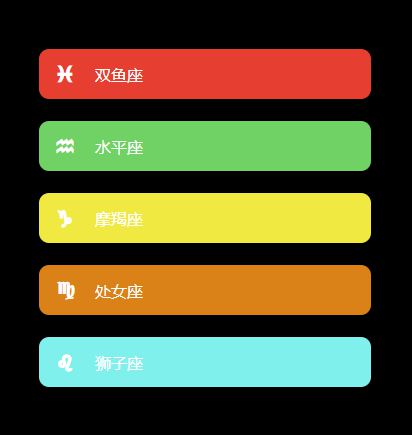
本篇文章給大家帶來了關于前端拖拽效果實現的相關知識,其中主要介紹了怎么用js來實現一個好看的拖拽效果?怎么排版布局?感興趣的朋友,下面一起來看一下吧,希望對大家有幫助。
前言
最近看見一個拖拽效果的視頻,看好多人評論說跟著敲也沒效果,還有就是作者也不回復大家提出的一些疑問,本著知其然必要知其所以然的心理,我把實現效果研究了一遍,并且了解了其實現原理,這里給大家復盤其原理,學到就是賺到
準備
這里我們要用到字體圖標,所以我們從iconfont阿里圖標庫直接引入
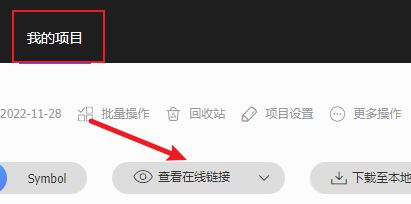
找到需要的圖標,添加進項目
找到圖標所在的項目,點擊查看鏈接
復制地址,或者點擊地址復制跳轉后地址鏈接

<link rel="stylesheet" href="https://at.alicdn.com/t/c/font_2579455_c6xlnvkj0j.cssspm=a313x.7781069.1998910419.53&file=font_2579455_c6xlnvkj0j.css">
創建所需要結構
把我們需要結構先寫出來
draggable:讓盒子可以進行拖拽
style="--color:#e63e31"--color讓盒子背景色根據--color顯示(與下方css樣式相聯系)
<div class="list">
    <div class="list-item" draggable="true" style="--color:#e63e31">
        <i class="iconfont icon-shuangyuzuo constellation"></i>
        <span class="list-item-title">雙魚座</span>
    </div>
    <div class="list-item" draggable="true" style="--color:#70d265">
        <i class="iconfont icon-shuipingzuo constellation"></i>
        <span class="list-item-title">水平座</span>
    </div>
    <div class="list-item" draggable="true" style="--color:#f0e941">
        <i class="iconfont icon-mojiezuo constellation"></i>
        <span class="list-item-title">摩羯座</span>
    </div>
    <div class="list-item" draggable="true" style="--color:#da8218">
        <i class="iconfont icon-chunvzuo constellation"></i>
        <span class="list-item-title">處女座</span>
    </div>
    <div class="list-item" draggable="true" style="--color:#7ff0ec">
        <i class="iconfont icon-shizizuo constellation"></i>
        <span class="list-item-title">獅子座</span>
    </div>
</div>
編寫樣式
這里直接采用flex對盒子進行排版布局
background-color: var(--color);var(--color)是或者自定義屬性的顏色
body{
  background-color: #000;
}
.list{
  width: 300px;
  height: 360px;
  /* padding: 20px 0; */
  margin: 100px auto 0;
  display: flex;
  flex-direction: column;
  justify-content: space-around;
}
.list-item{
  width: 100%;
  display: flex;
  align-items: center;
  padding: 0 16px;
  border-radius: 10px;
  /* margin-bottom: 20px; */
  background-color: var(--color);
}
.constellation{
  line-height: 2.5em;
  font-size: 20px;
  color: #fff;
}
.list-item-img{
  width: 30px;
  height: 30px;
}
.list-item-title{
  margin-left: 20px;
  color: #fff;
}
// 移動動畫class
.list-item.moving{
  background-color: transparent;
  border: 2px dashed #ccc;
}
js編寫拖拽效果
首先獲取需要用到的元素
// 獲取整個
listconst list = document.querySelector('.list')
// 獲取每一個盒子
const item = document.querySelectorAll('.list-item')
開始拖動的時候需要加上移動的類,并且設置移動效果
// 開始拖動
list.ondragstart = e => {
    source_node = e.target
    recode(item)
    setTimeout(() => {
        // 拖拽時樣式
        e.target.classList.add('moving')
    }, 0)
    // 設置拖動效果
    e.dataTransfer.effectAllowed = 'move'
}
拖拽中需要判斷是從上往下還是從下往上,根據拖拽元素和放入元素的索引進行比對,從而對拖拽元素進行插入節點操作
注意: 在碼上掘金從上往下的時候會出現bug,在瀏覽器不會,我個人覺得應該是是碼上掘金的問題
// 拖拽放入有效目標觸發
list.ondragenter = e => {
    e.preventDefault()
    console.log(e.target.id, list)
    if (e.target === list || e.target === source_node) {
        return false
    }
    const childer = Array.from(list.children)
    const sourceIndex = childer.indexOf(source_node)
    const targetIndex = childer.indexOf(e.target)
    // console.log(sourceIndex, targetIndex)
    if (sourceIndex < targetIndex) {
        // 從下往上拖動
        list.insertBefore(source_node, e.target.nextElementSibling)
    } else {
        // 從上往下拖動
        list.insertBefore(source_node, e.target)
    }
    // 動畫效果函數
    last([e.target, source_node])
}
拖拽結束后把拖拽時的樣式移除
// 拖放結束
list.ondragend = e => {
    e.target.classList.remove('moving')
}
解釋方法
這里有好多沒有用過或者比較少用的方法,這里給大家解釋一下
ondragstart:當用戶開始拖動一個元素或文本選擇時,會觸發dragstart事件
ondragover:當元素或文本選擇被拖到有效的拖放目標上時(每幾百毫秒一次),就會觸發拖放事件
ondragenter:當被拖動的元素或文本選擇進入有效的拖放目標時,會觸發dragenter事件
ondragend: 當拖放操作結束時(通過釋放鼠標按鈕或點擊escape鍵)觸發dragend事件。
e.dataTransfer.effectAllowed:用于設置拖放時的效果,常用參數有(move,link,copy)
getBoundingClientRect:返回元素對于視口的信息
requestAnimationFrame:重繪動畫
cancelAnimationFrame:用于取消requestAnimationFrame調用請求


