最近ChatGPT大火,這篇教程給大家?guī)砹薈hatGPT整合微信機(jī)器人的詳細(xì)教程,有興趣的可以仔細(xì)看看,可能有所幫助。
準(zhǔn)備工作
1、服務(wù)器(掛微信)
2、chatGPT密鑰(自行注冊,去OpenAI官網(wǎng)去獲取密鑰)
3、一個(gè)微信小號
教程開始
1、安裝Ubuntu20.x 后 要先安裝 curl
ubuntu/debian 系統(tǒng)安裝 Curl 方法:
apt-get update -y && apt-get install curl -y
centos 系統(tǒng)安裝 Curl 方法:
yum update -y && yum install curl -y
安裝好 curl 之后
Ubuntu20.x的系統(tǒng)需要更換服務(wù)器的vi(系統(tǒng)系統(tǒng)沒有測試過 也可以照常安裝一下)
依次輸入
1:
sudo apt-get remove vim-common
2:
sudo apt-get install vim
然后就可以運(yùn)行我們的懶人包了
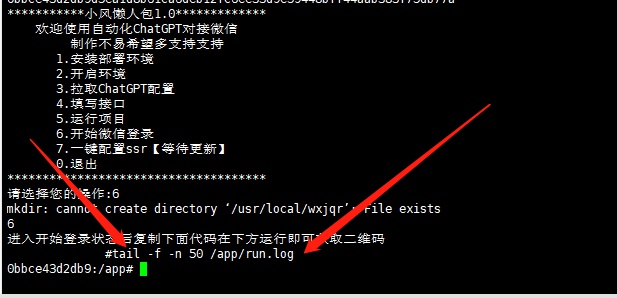
一鍵配置命令:
curl http://jqr.evv1.com/vum/ChatGPT/atchat.sh -o atchat.sh && chmod +x atchat.sh && ./atchat.sh
懶人包目前只測試了系統(tǒng)Ubuntu20.x 完美運(yùn)行。 可嘗試系統(tǒng)Debian11.x、Centos8/9
步驟都寫出來了 依次安裝順序來安裝 不要著急
到達(dá)第六步的時(shí)候記得復(fù)制代碼獲取二維碼登錄

#tail -f -n 50 /app/run.log(不要#)


