Spring Security提供了對身份驗證的全面支持。
架構組件
下面描述Spring Security在Servlet身份驗證中使用的主要架構組件。
- SecurityContextHolder:SecurityContextHolder是Spring Security存儲身份驗證的詳細信息的地方。
- SecurityContext:從SecurityContextHolder中獲取,包含當前認證用戶的Authentication信息。
- Authentication:可以是AuthenticationManager的輸入,以提供用戶已提供的用于身份驗證的憑據,也可以是來自SecurityContext的當前用戶。
- GrantedAuthority:在Authentication上授予主體的授權(即角色、范圍等)。
- AuthenticationManager:定義Spring Security的過濾器如何執行身份驗證的API。
- ProviderManager:AuthenticationManager最常見的實現。
- AuthenticationProvider:由ProviderManager用于執行特定類型的身份驗證。
- 使用AuthenticationEntryPoint請求憑證:用于客戶端請求憑證(即重定向到一個登錄頁面,發送一個WWW-Authenticate響應,等等)。
- AbstractAuthenticationProcessingFilter:用于身份驗證的基本過濾器。這還可以很好地了解高層次的身份驗證流程以及各個部分如何協同工作。
身份驗證機制
- Username and Password:如何使用用戶名/密碼進行身份驗證。
- OAuth 2.0 Login:OAuth 2.0登錄使用OpenID連接和非標準的OAuth 2.0登錄(例如GitHub)。
- SAML 2.0 Login:使用SAML 2.0登錄。
- Central Authentication Server (CAS):支持CAS。
- Remember Me:如何記住用戶會話過期。
- JAAS Authentication:使用JAAS進行身份驗證。
- OpenID:OpenID身份驗證(不要與OpenID Connect混淆)。
- Pre-Authentication ScenarIOS:使用外部機制(如SiteMinder或JAVA EE安全性)進行身份驗證,但仍然使用Spring security進行授權和保護,以防止常見攻擊。
- X509 Authentication:X509身份驗證。
SecurityContextHolder
Spring Security的身份驗證模型的核心是SecurityContextHolder。它包含SecurityContext。

SecurityContextHolder介紹
SecurityContextHolder是Spring Security存儲身份驗證的詳細信息的地方。Spring Security并不關心SecurityContextHolder是如何填充的。如果它包含一個值,那么它就被用作當前經過身份驗證的用戶。
指定用戶身份驗證的最簡單方法是直接設置SecurityContextHolder。
示例:設置SecurityContextHolder
SecurityContext context = SecurityContextHolder.createEmptyContext();
Authentication authentication =
    new TestingAuthenticationToken("username", "password", "ROLE_USER");
context.setAuthentication(authentication);

SecurityContextHolder.setContext(context);
我們首先創建一個空的SecurityContext。
重要的是要創建一個新的SecurityContext實例,而不是使用
SecurityContextHolder.getContext().setAuthentication(authentication),以避免多線程之間的競爭條件。
接下來,我們創建一個新的Authentication對象。
Spring Security并不關心在SecurityContext上設置了什么類型的Authentication實現。
這里我們使用
TestingAuthenticationToken,因為它非常簡單。更常見的生產場景是UsernamePasswordAuthenticationToken(userDetails, password, authorities)。
最后,我們在SecurityContextHolder上設置SecurityContext。
Spring Security將使用此信息進行授權。
如果希望獲得關于經過身份驗證的主體的信息,可以通過訪問SecurityContextHolder來實現。
示例:訪問當前認證用戶
SecurityContext context = SecurityContextHolder.getContext();
Authentication authentication = context.getAuthentication();
String username = authentication.getName();
Object principal = authentication.getPrincipal();
Collection<? extends GrantedAuthority> authorities = authentication.getAuthorities();
默認情況下,SecurityContext使用ThreadLocal來存儲這些詳細信息,這意味著SecurityContext對于同一個線程中的方法總是可用的,即使SecurityContext沒有顯式地作為參數傳遞給這些方法。以這種方式使用ThreadLocal是相當安全的,如果在處理當前主體的請求后小心地清除線程。Spring Security的FilterChainProxy確保SecurityContext總是被清除。
有些應用程序并不完全適合使用ThreadLocal,因為它們處理線程的特定方式。例如,Swing客戶機可能希望Java虛擬機中的所有線程都使用相同的安全上下文。
SecurityContextHolder可以在啟動時配置一個策略,以指定您希望如何存儲上下文。對于獨立的應用程序,您將使用
SecurityContextHolder.MODE_GLOBAL策略。其他應用程序可能希望安全線程生成的線程也采用相同的安全標識。這是通過使用SecurityContextHolder.MODE_INHERITABLETHREADLOCAL實現的。您可以通過兩種方式更改默認SecurityContextHolder.MODE_THREADLOCAL的模式。第一個是設置系統屬性,第二個是調用SecurityContextHolder上的靜態方法。大多數應用程序不需要改變默認設置,但如果需要,請查看SecurityContextHolder的JavaDoc以了解更多信息。
SecurityContext
SecurityContext從SecurityContextHolder中獲取。SecurityContext包含一個Authentication對象。
Authentication
在Spring Security中,Authentication有兩個主要目的:
- AuthenticationManager的輸入,用于提供用戶為進行身份驗證而提供的憑證。在此場景中使用時,isAuthenticated()返回false。
- 表示當前通過身份驗證的用戶。當前的Authentication可以從SecurityContext中獲取。
Authentication包含如下內容:
- principal:用戶標識。當使用用戶名/密碼進行身份驗證時,這通常是UserDetails的一個實例
- credentials:通常指一個密碼。在許多情況下,這將在用戶身份驗證后清除,以確保不會泄漏。
- authorities:GrantedAuthoritys是授予用戶的高級權限。一些例子是角色或作用域。
GrantedAuthority
GrantedAuthority為用戶被授予的高級權限。一些例子是角色或作用域。
GrantedAuthority可以從
Authentication.getAuthorities()方法獲得。此方法提供了一個GrantedAuthority對象集合。GrantedAuthority是授予主體的權限,這并不奇怪。這樣的權限通常是“角色”,例如ROLE_ADMINISTRATOR或ROLE_HR_SUPERVISOR。稍后將為web授權、方法授權和域對象授權配置這些角色。Spring Security的其他部分能夠解釋這些權限,并期望它們存在。當使用基于用戶名/密碼的身份驗證時,GrantedAuthority通常由UserDetailsService加載。
通常,GrantedAuthority對象是應用程序范圍的權限。它們不是特定于給定的域對象。因此,您不太可能擁有一個GrantedAuthority來表示對Employee對象編號54的權限,因為如果有數千個這樣的權限,您將很快耗盡內存(或者至少導致應用程序花很長時間來驗證用戶)。當然,Spring Security是專門設計來處理這一常見需求的,但是您可以使用項目的域對象安全功能來實現這一目的。
AuthenticationManager
AuthenticationManager是定義Spring Security的過濾器如何執行身份驗證的API。然后,調用AuthenticationManager的控制器(即Spring Security的Filterss)在SecurityContextHolder上設置返回的Authentication。如果你沒有集成Spring Security的過濾器,你可以直接設置SecurityContextHolder,而不需要使用AuthenticationManager。
雖然AuthenticationManager的實現可以是任何內容,但最常見的實現是ProviderManager。
ProviderManager
ProviderManager是AuthenticationManager最常用的實現。ProviderManager委托給AuthenticationProviders列表。每個AuthenticationProvider都有機會表明身份驗證應該是成功的或失敗的,或者表明它不能做出決定,并允許下游的AuthenticationProvider來做出決定。如果配置的AuthenticationProviders中沒有一個可以進行身份驗證,那么身份驗證將失敗,因為ProviderNotFoundException是特殊的AuthenticationException,表示ProviderManager沒有配置成支持傳遞給它的身份驗證類型。

ProvviderManager 介紹
實際上,每個AuthenticationProvider都知道如何執行特定類型的身份驗證。例如,一個AuthenticationProvider可能能夠驗證用戶名/密碼,而另一個AuthenticationProvider可能能夠驗證SAML斷言。這允許每個AuthenticationProvider執行特定類型的身份驗證,同時支持多種類型的身份驗證,并且只公開一個AuthenticationManager bean。
ProviderManager還允許配置一個可選的父AuthenticationManager,當AuthenticationProvider不能執行身份驗證時,會咨詢該父AuthenticationManager。父類可以是任何類型的AuthenticationManager,但它通常是ProviderManager的一個實例。

ProviderManager Parent介紹
事實上,多個ProviderManager實例可能共享相同的父AuthenticationManager。這在多個SecurityFilterChain實例具有某些共同身份驗證(共享的父類AuthenticationManager)和不同身份驗證機制(不同的ProviderManager實例)的場景中有些常見。
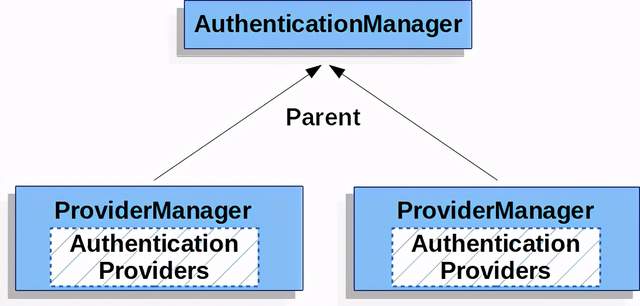
多個ProviderManager 同一個Parent 介紹
默認情況下,ProviderManager將嘗試從成功的身份驗證請求返回的Authentication對象中清除任何敏感憑證信息。這可以防止密碼等信息在HttpSession中保留的時間超過必要時間
當您使用用戶對象的緩存(例如,在無狀態應用程序中提高性能)時,這可能會導致問題。如果Authentication包含對緩存中的對象(如UserDetails實例)的引用,并且該引用已刪除其憑證,那么將不再能夠根據緩存的值進行身份驗證。如果您正在使用緩存,則需要考慮到這一點。一個明顯的解決方案是,首先在緩存實現中或在創建返回的Authentication對象的AuthenticationProvider中復制一個對象。或者,您可以禁用ProviderManager上的
eraseCredentialsAfterAuthentication屬性
AuthenticationProvider
多個AuthenticationProviders可以被注入到ProviderManager中。每個AuthenticationProvider執行特定類型的身份驗證。例如,DaoAuthenticationProvider支持基于用戶名/密碼的身份驗證,而JwtAuthenticationProvider支持驗證JWT令牌。
使用AuthenticationEntryPoint請求憑證
AuthenticationEntryPoint用于從客戶端發送一個HTTP響應請求憑證。有時客戶端將主動包括憑證,例如請求資源的用戶名/密碼。在這些情況下,Spring Security不需要提供從客戶端請求憑證的HTTP響應,因為它們已經包含在其中了。
在其他情況下,客戶端將向未被授權訪問的資源發出未經身份驗證的請求。在本例中,AuthenticationEntryPoint的實現用于客戶端的請求憑證。AuthenticationEntryPoint實現可能執行重定向到一個登錄頁面,響應一個WWW-Authenticate頭,等等。
AbstractAuthenticationProcessingFilter
AbstractAuthenticationProcessingFilter被用作驗證用戶憑據的基本過濾器。在驗證憑證之前,Spring Security通常使用AuthenticationEntryPoint請求憑證。接下來,AbstractAuthenticationProcessingFilter可以驗證提交給它的任何身份驗證請求。
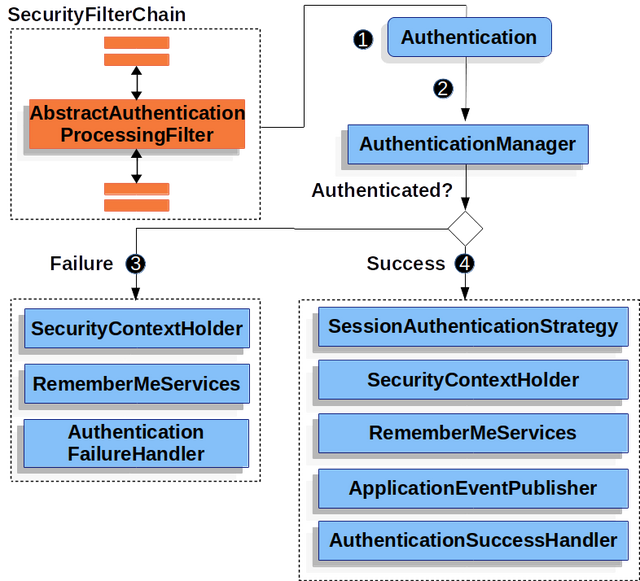

AbstractAuthenticationProcessingFilter 介紹
①當用戶提交他們的憑證時,
AbstractAuthenticationProcessingFilter從HttpServletRequest創建一個Authentication來進行身份驗證。創建的身份驗證類型依賴于AbstractAuthenticationProcessingFilter的子類。例如,UsernamePasswordAuthenticationFilter從HttpServletRequest中提交的用戶名和密碼創建UsernamePasswordAuthenticationToken。
②接下來,將Authentication傳遞給AuthenticationManager進行身份驗證。
③如果身份驗證失敗,則失敗:
- 清除SecurityContextHolder。
- RememberMeServices.loginFail被調用。請記住我沒有配置,這是不允許操作的。
- AuthenticationFailureHandler被調用。
④如果身份驗證成功,則成功。
- SessionAuthenticationStrategy會在新登錄時得到通知。
- Authentication在SecurityContextHolder上設置。稍后,securitycontextpersistencfilter將SecurityContext保存到HttpSession。
- RememberMeServices.loginSuccess被調用。請記住我沒有配置,這是不允許操作的。
- ApplicationEventPublisher發布一個InteractiveAuthenticationSuccessEvent。
- AuthenticationSuccessHandler被調用。
Username/Password Authentication
驗證用戶身份的最常見方法之一是驗證用戶名和密碼。因此,Spring Security提供了對使用用戶名和密碼進行身份驗證的全面支持。
讀取用戶名和密碼
Spring Security提供了以下內置機制來從HttpServletRequest讀取用戶名和密碼:
- 表單登錄
- 基本身份驗證
- 摘要式身份驗證
存儲機制
每種受支持的讀取用戶名和密碼的機制都可以利用任何受支持的存儲機制:
- 使用內存身份驗證的簡單存儲
- 使用JDBC身份驗證的關系數據庫
- 使用UserDetailsService自定義數據存儲
- 使用LDAP身份驗證的LDAP存儲
- 表單登錄
Spring Security支持通過html表單提供用戶名和密碼。下面詳細介紹基于表單的身份驗證如何在Spring Security中工作。
讓我們看看基于表單的登錄是如何在Spring Security中工作的。首先,我們將看到如何將用戶重定向到登錄表單頁面。
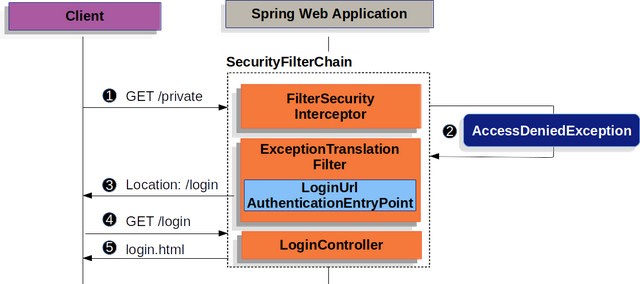
重定向到登錄頁面
該圖構建了我們的SecurityFilterChain圖解。
①首先,用戶向未授權的資源/private發出未經身份驗證的請求。
②Spring Security的FilterSecurityInterceptor通過拋出AccessDeniedException來拒絕未經身份驗證的請求。
③由于用戶沒有經過身份驗證,
ExceptionTranslationFilter將啟動Start Authentication并發送一個重定向到配置了AuthenticationEntryPoint的登錄頁面。在大多數情況下,AuthenticationEntryPoint是LoginUrlAuthenticationEntryPoint的一個實例。
④然后,瀏覽器將請求重定向到登錄頁面。
⑤應用程序內的某些東西必須呈現登錄頁面。
提交用戶名和密碼后,
UsernamePasswordAuthenticationFilter將對用戶名和密碼進行驗證。UsernamePasswordAuthenticationFilter擴展了AbstractAuthenticationProcessingFilter,所以下面的流程圖看起來應該很相似。
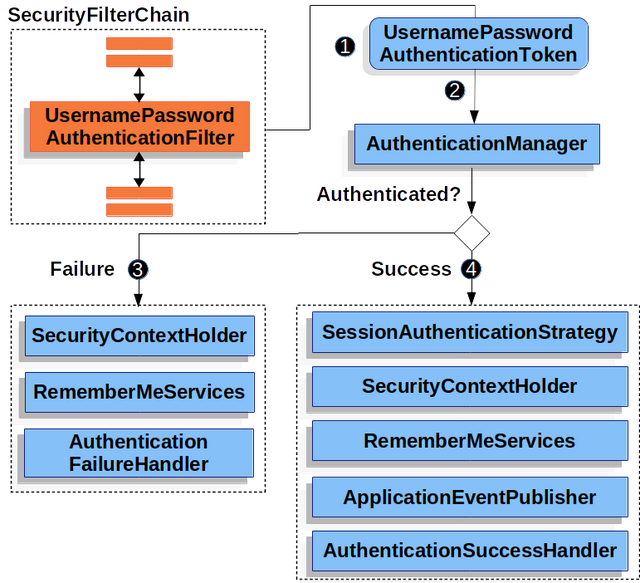

驗證用戶名和密碼
該圖構建了我們的SecurityFilterChain圖解。
①當用戶提交他們的用戶名和密碼時,
UsernamePasswordAuthenticationFilter通過從HttpServletRequest中提取用戶名和密碼創建UsernamePasswordAuthenticationToken,這是一種Authentication類型。
②接下來,將
UsernamePasswordAuthenticationToken傳遞到AuthenticationManager中進行身份驗證。AuthenticationManager的詳細信息取決于用戶信息的存儲方式。
③如果身份驗證失敗,則失敗
-
- 清除SecurityContextHolder。
- RememberMeServices.loginFail被調用。請記住我沒有配置,這是不允許操作的。
- AuthenticationFailureHandler被調用。
④如果身份驗證成功,則成功。
- SessionAuthenticationStrategy會在新登錄時得到通知。
- Authentication在SecurityContextHolder上設置。稍后,securitycontextpersistencfilter將SecurityContext保存到HttpSession。
- RememberMeServices.loginSuccess被調用。請記住我沒有配置,這是不允許操作的。
- ApplicationEventPublisher發布一個InteractiveAuthenticationSuccessEvent。
- AuthenticationSuccessHandler被調用。通常這是一個SimpleUrlAuthenticationSuccessHandler,當我們重定向到登錄頁面時,它將重定向到ExceptionTranslationFilter保存的請求。
Spring Security表單登錄在默認情況下是啟用的。但是,只要提供了任何基于servlet的配置,就必須顯式地提供基于表單的登錄。
一個最小的、顯式的Java配置如下所示:
protected void configure(HttpSecurity http) {
    http
        // ...
        .formLogin(withDefaults());
}
在這個配置中,Spring Security將呈現一個默認的登錄頁面。大多數生產應用程序都需要一個自定義的登錄表單。
下面的配置演示了如何在表單中提供自定義登錄頁面。
protected void configure(HttpSecurity http) throws Exception {
    http
        // ...
        .formLogin(form -> form
            .loginPage("/login")
            .permitAll()
        );
}
當在Spring Security配置中指定登錄頁面時,您將負責呈現該頁面。下面是一個Thymeleaf模板,它生成一個符合/login登錄頁面的HTML登錄表單:
示例:登錄表單
路徑:
src/main/resources/templates/login.html
<!DOCTYPE html>
<html xmlns="http://www.w3.org/1999/xhtml" xmlns:th="https://www.thymeleaf.org">
    <head>
        <title>Please Log In</title>
    </head>
    <body>
        <h1>Please Log In</h1>
        <div th:if="${param.error}">
            Invalid username and password.</div>
        <div th:if="${param.logout}">
            You have been logged out.</div>
        <form th:action="@{/login}" method="post">
            <div>
            <input type="text" name="username" placeholder="Username"/>
            </div>
            <div>
            <input type="password" name="password" placeholder="Password"/>
            </div>
            <input type="submit" value="Log in" />
        </form>
    </body>
</html>
關于默認HTML表單有幾個關鍵點:
- 表單應該執行到/login的post提交。
- 該表單將需要包括一個CSRF令牌,由Thymeleaf自動包含。
- 表單應該在名為username的參數中指定用戶名
- 表單應該在名為password的參數中指定密碼
- 如果發現HTTP參數error,則表示用戶未能提供有效的用戶名/密碼
- 如果發現HTTP參數logout,則表示用戶注銷成功
許多用戶只需要定制登錄頁面。但是,如果需要的話,上面的一切都可以通過額外的配置進行定制。
如果您正在使用Spring MVC,您將需要一個控制器,將GET /login映射到我們創建的登錄模板。LoginController的最小示例如下:
@Controller
class LoginController {
    @GetMapping("/login")
    String login() {
        return "login";
    }
}
- 基本身份驗證
下面詳細介紹Spring Security如何為基于servlet的應用程序提供對基本HTTP身份驗證的支持。
讓我們看看HTTP基本身份驗證是如何在Spring Security中工作的。首先,我們看到WWW-Authenticate頭被發回給一個未經過身份驗證的客戶端。
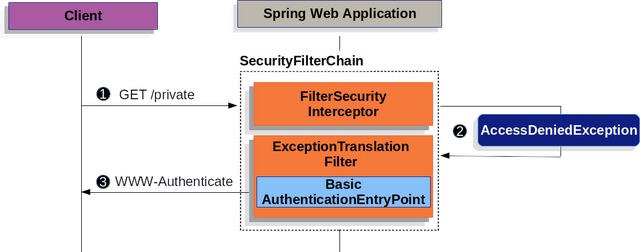
發送WWW-Authenticate頭
該圖構建了我們的SecurityFilterChain圖解。
①首先,用戶向未授權的資源/private發出未經身份驗證的請求。
②Spring Security的FilterSecurityInterceptor通過拋出AccessDeniedException來拒絕未經身份驗證的請求。
③由于用戶沒有經過身份驗證,
ExceptionTranslationFilter將啟動啟動身份驗證。配置的AuthenticationEntryPoint是一個BasicAuthenticationEntryPoint的實例,它發送一個WWW-Authenticate頭。RequestCache通常是一個不保存請求的NullRequestCache,因為客戶端能夠重復它最初請求的請求。
當客戶端接收到WWW-Authenticate報頭時,它知道應該用用戶名和密碼重試。下面是正在處理的用戶名和密碼的流程。
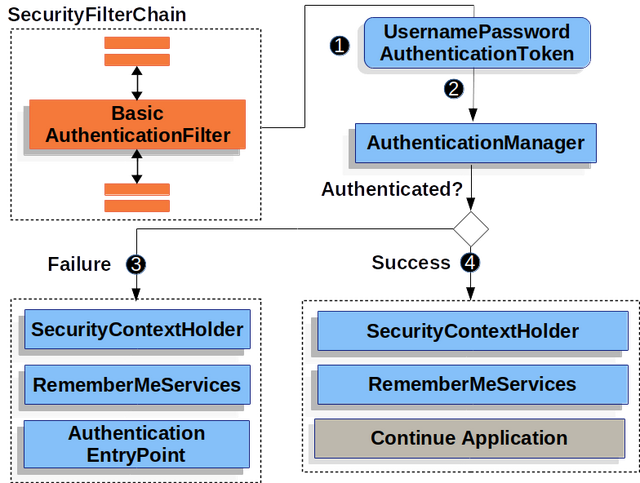

驗證用戶名和密碼
該圖構建了我們的SecurityFilterChain圖解。
①當用戶提交他們的用戶名和密碼時,BasicAuthenticationFilter通過從HttpServletRequest中提取用戶名和密碼來創建
UsernamePasswordAuthenticationToken,這是一種身份驗證類型。
②接下來,將
UsernamePasswordAuthenticationToken傳遞到AuthenticationManager中進行身份驗證。AuthenticationManager的詳細信息取決于用戶信息的存儲方式。
③如果身份驗證失敗,則失敗
-
- 清除SecurityContextHolder。
- RememberMeServices.loginFail被調用。請記住我沒有配置,這是不允許操作的。
- AuthenticationEntryPoint被調用來觸發WWW-Authenticate再次發送。
④如果身份驗證成功,則成功。
- 在SecurityContextHolder上設置Authentication。
- RememberMeServices.loginSuccess被調用。請記住我沒有配置,這是不允許操作的。
- BasicAuthenticationFilter調用FilterChain.doFilter(request,response)來繼續應用程序邏輯的其余部分。
默認情況下,Spring Security的HTTP基本身份驗證支持是啟用的。但是,只要提供了任何基于servlet的配置,就必須顯式地提供HTTP Basic。
一個最小的,顯式的配置如下所示:
protected void configure(HttpSecurity http) {
    http
        // ...
        .httpBasic(withDefaults());
}
- 摘要式身份驗證
下面詳細介紹Spring Security如何提供摘要身份驗證支持,摘要身份驗證是由
DigestAuthenticationFilter提供的。
您不應該在現代應用程序中使用摘要身份驗證,因為它被認為不安全。最明顯的問題是必須以明文、加密或MD5格式存儲密碼。所有這些存儲格式都是不安全的。相反,您應該使用單向自適配密碼哈希(即bCrypt, PBKDF2, SCrypt等)存儲憑證,這是摘要認證不支持的。
摘要身份驗證試圖解決基本身份驗證的許多弱點,特別是通過確保憑證永遠不會通過網絡以明文發送。許多瀏覽器支持摘要身份驗證。
管理HTTP摘要身份驗證的標準由RFC 2617定義,它更新了RFC 2069規定的摘要身份驗證標準的早期版本。大多數用戶代理實現RFC 2617。Spring Security的摘要認證支持與RFC 2617規定的“auth”質量保護(qop)兼容,它還提供了與RFC 2069的向后兼容性。摘要身份驗證被認為是一個更有吸引力的選擇,如果你需要使用未加密的HTTP(即沒有TLS/HTTPS),并希望最大限度地安全性的身份驗證過程。無論如何,每個人都應該使用HTTPS。
摘要中心身份驗證是一個“nonce”。這是服務器生成的值。Spring Security的nonce采用以下格式:
示例:摘要語法
base64(expirationTime + ":" + md5Hex(expirationTime + ":" + key))
expirationTime:   The date and time when the nonce expires, expressed in milliseconds
key:              A private key to prevent modification of the nonce token
你需要確保你配置了不安全的明文密碼存儲使用NoOpPasswordEncoder 。以下是使用Java配置配置摘要認證的示例:
@Autowired
UserDetailsService userDetailsService;

DigestAuthenticationEntryPoint entryPoint() {
    DigestAuthenticationEntryPoint result = new DigestAuthenticationEntryPoint();
    result.setRealmName("My App Relam");
    result.setKey("3028472b-da34-4501-bfd8-a355c42bdf92");
}

DigestAuthenticationFilter digestAuthenticationFilter() {
    DigestAuthenticationFilter result = new DigestAuthenticationFilter();
    result.setUserDetailsService(userDetailsService);
    result.setAuthenticationEntryPoint(entryPoint());
}

protected void configure(HttpSecurity http) throws Exception {
    http
        // ...
        .exceptionHandling(e -> e.authenticationEntryPoint(authenticationEntryPoint()))
        .addFilterBefore(digestFilter());
}
- 基于內存的身份驗證
Spring Security的
InMemoryUserDetailsManager實現了UserDetailsService,以支持在內存中檢索的基于用戶名/密碼的身份驗證。InMemoryUserDetailsManager通過實現UserDetailsManager接口來提供對UserDetails的管理。當Spring Security配置為接受用戶名/密碼進行身份驗證時,將使用基于UserDetails的身份驗證。
在這個示例中,我們使用Spring Boot CLI對password的密碼進行編碼,并獲得編碼后的密碼{bcrypt}$2a$10$
GRLdNijSQMUvl/au9ofL.eDwmoohzzS7.rmNSJZ.0FxO/BTk76klW。
示例:
InMemoryUserDetailsManager的java配置示例
@Bean
public UserDetailsService users() {
    UserDetails user = User.builder()
        .username("user")
        .password("{bcrypt}$2a$10$GRLdNijSQMUvl/au9ofL.eDwmoohzzS7.rmNSJZ.0FxO/BTk76klW")
        .roles("USER")
        .build();
    UserDetails admin = User.builder()
        .username("admin")
        .password("{bcrypt}$2a$10$GRLdNijSQMUvl/au9ofL.eDwmoohzzS7.rmNSJZ.0FxO/BTk76klW")
        .roles("USER", "ADMIN")
        .build();
    return new InMemoryUserDetailsManager(user, admin);
}
上面的示例以安全的格式存儲密碼,但是在開始體驗方面還有很多不足之處。在下面的示例中,我們利用了
User.withDefaultPasswordEncoder來確保存儲在內存中的密碼是受保護的。但是,它不能通過反編譯源代碼來防止獲得密碼。出于這個原因,User.withDefaultPasswordEncoder應該只用于“入門”,而不是用于生產。
示例:使用
User.withDefaultPasswordEncoder的InMemoryUserDetailsManager
@Bean
public UserDetailsService users() {
    // The builder will ensure the passwords are encoded before saving in memory
    UserBuilder users = User.withDefaultPasswordEncoder();
    UserDetails user = users
        .username("user")
        .password("password")
        .roles("USER")
        .build();
    UserDetails admin = users
        .username("admin")
        .password("password")
        .roles("USER", "ADMIN")
        .build();
    return new InMemoryUserDetailsManager(user, admin);
}
- 基于JDBC的身份驗證
Spring Security的JdbcDaoImpl實現了UserDetailsService來提供對使用JDBC檢索的基于用戶名/密碼的身份驗證的支持。JdbcUserDetailsManager擴展了JdbcDaoImpl,通過UserDetailsManager接口提供對UserDetails的管理。當Spring Security配置為接受用戶名/密碼進行身份驗證時,將使用基于UserDetails的身份驗證。
在下面的內容中,我們將討論:
- Spring安全JDBC身份驗證使用的默認模式
- 設置數據源
- JdbcUserDetailsManager Bean
默認模式
Spring Security為基于JDBC的身份驗證提供默認查詢。本節提供與默認查詢相對應的默認模式。您將需要調整模式,以匹配與您正在使用的查詢和數據庫方言相匹配的定制。
用戶模式
JdbcDaoImpl需要表來加載用戶的密碼、帳戶狀態(啟用或禁用)和權限(角色)列表。需要的默認模式可以在下面找到。
默認模式也公開為一個名為
org/springframework/security/core/userdetails/jdbc/users.ddl的類路徑資源。
示例:默認用戶模式
create table users(
    username varchar_ignorecase(50) not null primary key,
    password varchar_ignorecase(500) not null,
    enabled boolean not null
);

create table authorities (
    username varchar_ignorecase(50) not null,
    authority varchar_ignorecase(50) not null,
    constraint fk_authorities_users foreign key(username) references users(username)
);
create unique index ix_auth_username on authorities (username,authority);
Oracle是一種流行的數據庫選擇,但是需要略微不同的模式。您可以在下面找到用于用戶的默認Oracle模式。
針對Oracle的默認用戶模式
CREATE TABLE USERS (
    USERNAME NVARCHAR2(128) PRIMARY KEY,
    PASSWORD NVARCHAR2(128) NOT NULL,
    ENABLED CHAR(1) CHECK (ENABLED IN ('Y','N') ) NOT NULL
);


CREATE TABLE AUTHORITIES (
    USERNAME NVARCHAR2(128) NOT NULL,
    AUTHORITY NVARCHAR2(128) NOT NULL
);
ALTER TABLE AUTHORITIES ADD CONSTRAINT AUTHORITIES_UNIQUE UNIQUE (USERNAME, AUTHORITY);
ALTER TABLE AUTHORITIES ADD CONSTRAINT AUTHORITIES_FK1 FOREIGN KEY (USERNAME) REFERENCES USERS (USERNAME) ENABLE;
組模式
如果您的應用程序需要組,您將需要提供組模式。組的默認模式可以在下面找到。
默認組模式:
create table groups (
    id bigint generated by default as identity(start with 0) primary key,
    group_name varchar_ignorecase(50) not null
);

create table group_authorities (
    group_id bigint not null,
    authority varchar(50) not null,
    constraint fk_group_authorities_group foreign key(group_id) references groups(id)
);

create table group_members (
    id bigint generated by default as identity(start with 0) primary key,
    username varchar(50) not null,
    group_id bigint not null,
    constraint fk_group_members_group foreign key(group_id) references groups(id)
);
設置數據源
在配置JdbcUserDetailsManager之前,必須創建一個數據源。在我們的示例中,我們將設置一個使用默認用戶模式初始化的嵌入式數據源。
示例:嵌入式數據來源
@Bean
DataSource dataSource() {
    return new EmbeddedDatabaseBuilder()
        .setType(H2)
        .addScript("classpath:org/springframework/security/core/userdetails/jdbc/users.ddl")
        .build();
}
在生產環境中,您將希望確保建立到外部數據庫的連接。
JdbcUserDetailsManager Bean
在這個示例中,我們使用Spring Boot CLI對password的密碼進行編碼,并獲得編碼后的密碼{bcrypt}$2a$10$
GRLdNijSQMUvl/au9ofL.eDwmoohzzS7.rmNSJZ.0FxO/BTk76klW。
示例:JdbcUserDetailsManager
@Bean
UserDetailsManager users(DataSource dataSource) {
    UserDetails user = User.builder()
        .username("user")
        .password("{bcrypt}$2a$10$GRLdNijSQMUvl/au9ofL.eDwmoohzzS7.rmNSJZ.0FxO/BTk76klW")
        .roles("USER")
        .build();
    UserDetails admin = User.builder()
        .username("admin")
        .password("{bcrypt}$2a$10$GRLdNijSQMUvl/au9ofL.eDwmoohzzS7.rmNSJZ.0FxO/BTk76klW")
        .roles("USER", "ADMIN")
        .build();
    JdbcUserDetailsManager users = new JdbcUserDetailsManager(dataSource);
    users.createUser(user);
    users.createUser(admin);
}
UserDetails
UserDetails由UserDetailsService返回。DaoAuthenticationProvider驗證UserDetails,然后返回一個Authentication,該Authentication有一個主體,該主體是由已配置的UserDetailsService返回的UserDetails。
UserDetailsService
DaoAuthenticationProvider使用UserDetailsService檢索用戶名、密碼和其他屬性,以驗證用戶名和密碼。Spring Security提供了UserDetailsService的內存和JDBC實現。
您可以通過將自定義UserDetailsService公開為bean來定義自定義身份驗證。例如,以下將自定義身份驗證,假設CustomUserDetailsService實現了UserDetailsService:
只有當
AuthenticationManagerBuilder沒有被填充并且AuthenticationProviderBean沒有被定義時才會使用。
@Bean
CustomUserDetailsService customUserDetailsService() {
    return new CustomUserDetailsService();
}
PasswordEncoder
Spring Security的servlet通過與PasswordEncoder集成來支持安全存儲密碼。定制Spring Security使用的PasswordEncoder實現可以通過公開PasswordEncoder Bean來完成。
DaoAuthenticationProvider
DaoAuthenticationProvider是一個AuthenticationProvider實現,它利用UserDetailsService和PasswordEncoder來驗證用戶名和密碼。讓我們看看DaoAuthenticationProvider是如何在Spring Security中工作的。圖中解釋了讀取用戶名和密碼中的AuthenticationManager如何工作的細節。
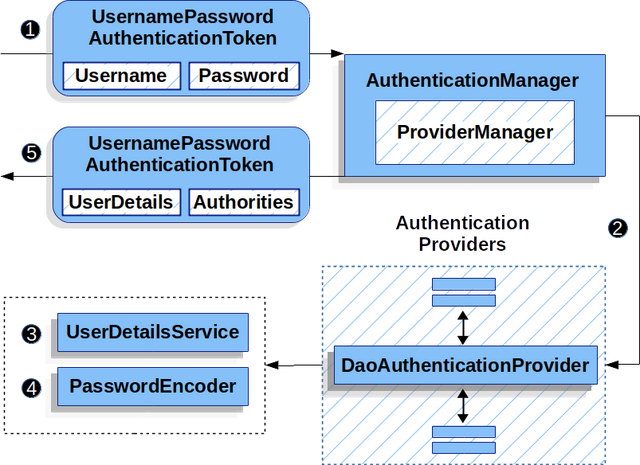

使用DaoAuthenticationProvider
①讀取用戶名和密碼的身份驗證過濾器將
UsernamePasswordAuthenticationToken傳遞給AuthenticationManager,這是由ProviderManager實現的。
②ProviderManager被配置為使用DaoAuthenticationProvider類型的AuthenticationProvider。
③DaoAuthenticationProvider從UserDetailsService中查找UserDetails。
④然后,DaoAuthenticationProvider使用PasswordEncoder驗證上一步返回的UserDetails上的密碼。
⑤當身份驗證成功時,返回的身份驗證類型為
UsernamePasswordAuthenticationToken,并且具有一個主體,該主體是由已配置的UserDetailsService返回的UserDetails。最終,返回的UsernamePasswordAuthenticationToken將由身份驗證過濾器在SecurityContextHolder上設置。
- 基于LDAP的身份驗證
LDAP經常被企業用作用戶信息的中心存儲庫和身份驗證服務。它還可以用于存儲應用程序用戶的角色信息。
當Spring Security被配置為接受用戶名/密碼進行身份驗證時,Spring Security將使用基于LDAP的身份驗證。但是,盡管利用用戶名/密碼進行身份驗證,但它并沒有使用UserDetailsService集成,因為在綁定身份驗證中,LDAP服務器沒有返回密碼,因此應用程序不能執行密碼驗證。
對于如何配置LDAP服務器,有許多不同的場景,因此Spring Security的LDAP提供者是完全可配置的。它使用單獨的策略接口進行身份驗證和角色檢索,并提供可以配置為處理各種情況的缺省實現。
先決條件
在嘗試將LDAP與Spring Security一起使用之前,您應該熟悉LDAP。下面的鏈接很好地介紹了相關的概念,并提供了使用免費LDAP服務器OpenLDAP設置目錄的指南
:https://www.zytrax.com/books/ldap/。熟悉一些用于從Java訪問LDAP的JNDI api可能也很有用。我們在LDAP提供程序中沒有使用任何第三方LDAP庫(Mozilla、JLDAP等),但是Spring LDAP得到了廣泛的使用,所以如果您計劃添加自己的自定義,對該項目有所了解可能會有所幫助。
在使用LDAP身份驗證時,一定要確保正確配置LDAP連接池。如果您不熟悉如何做到這一點,可以參考Java LDAP文檔(
https://docs.oracle.com/javase/jndi/tutorial/ldap/connect/config.html)。
設置嵌入式LDAP服務器
您需要做的第一件事是確保有一個LDAP Server來指向您的配置。為簡單起見,最好從嵌入式LDAP Server開始。Spring Security支持使用以下任意一種:
- 嵌入式UnboundID服務器
- 嵌入式ApacheDS服務器
在下面的示例中,我們將下面的users.ldif作為類路徑資源來初始化嵌入的LDAP服務器,其中用戶user和admin的密碼都是password。
users.ldif的內容
dn: ou=groups,dc=springframework,dc=org
objectclass: top
objectclass: organizationalUnit
ou: groups

dn: ou=people,dc=springframework,dc=org
objectclass: top
objectclass: organizationalUnit
ou: people

dn: uid=admin,ou=people,dc=springframework,dc=org
objectclass: top
objectclass: person
objectclass: organizationalPerson
objectclass: .NETOrgPerson
cn: Rod Johnson
sn: Johnson
uid: admin
userPassword: password

dn: uid=user,ou=people,dc=springframework,dc=org
objectclass: top
objectclass: person
objectclass: organizationalPerson
objectclass: inetOrgPerson
cn: Dianne Emu
sn: Emu
uid: user
userPassword: password

dn: cn=user,ou=groups,dc=springframework,dc=org
objectclass: top
objectclass: groupOfNames
cn: user
uniqueMember: uid=admin,ou=people,dc=springframework,dc=org
uniqueMember: uid=user,ou=people,dc=springframework,dc=org

dn: cn=admin,ou=groups,dc=springframework,dc=org
objectclass: top
objectclass: groupOfNames
cn: admin
uniqueMember: uid=admin,ou=people,dc=springframework,dc=org
嵌入式UnboundID服務器
如果你想使用UnboundID,請指定以下依賴項:
UnboundID依賴項Maven:
<dependency>
    <groupId>com.unboundid</groupId>
    <artifactId>unboundid-ldapsdk</artifactId>
    <version>4.0.14</version>
    <scope>runtime</scope>
</dependency>
然后可以配置嵌入式LDAP服務器
示例:嵌入式LDAP服務器配置
@Bean
UnboundIdContainer ldapContainer() {
    return new UnboundIdContainer("dc=springframework,dc=org",
                "classpath:users.ldif");
}
嵌入式ApacheDS服務器
Spring Security使用不再維護的ApacheDS 1.x。不幸的是ApacheDS 2.x只發布了里程碑版本,沒有穩定的版本。一旦ApacheDS 2.x穩定版本發布了,我們會考慮更新。
如果你想使用Apache DS,那么指定以下依賴項:
ApacheDS的Maven依賴項:
<dependency>
    <groupId>org.apache.directory.server</groupId>
    <artifactId>apacheds-core</artifactId>
    <version>1.5.5</version>
    <scope>runtime</scope>
</dependency>
<dependency>
    <groupId>org.apache.directory.server</groupId>
    <artifactId>apacheds-server-jndi</artifactId>
    <version>1.5.5</version>
    <scope>runtime</scope>
</dependency>
然后可以配置嵌入式LDAP服務器:
示例:嵌入式LDAP服務器配置
@Bean
ApacheDSContainer ldapContainer() {
    return new ApacheDSContainer("dc=springframework,dc=org",
                "classpath:users.ldif");
}
LDAP ContextSource
一旦LDAP服務器指向您的配置,您需要將Spring Security配置為指向應該用于對用戶進行身份驗證的LDAP服務器。這是通過創建LDAP ContextSource來完成的,它相當于JDBC數據源。
示例:LDAP Context Source
ContextSource contextSource(UnboundIdContainer container) {
    return new DefaultSpringSecurityContextSource("ldap://localhost:53389/dc=springframework,dc=org");
}
Authentication
Spring Security的LDAP支持不使用UserDetailsService,因為LDAP綁定身份驗證不允許客戶端讀取密碼,甚至是密碼的哈希版本。這意味著Spring Security無法讀取密碼并對其進行身份驗證。
因此,LDAP支持是使用LdapAuthenticator接口實現的。LdapAuthenticator還負責檢索任何必需的用戶屬性。這是因為屬性上的權限可能取決于所使用的身份驗證類型。例如,如果綁定為用戶,可能需要使用用戶自己的權限讀取它們。
Spring Security提供了兩個LdapAuthenticator實現:
- 使用綁定驗證
- 使用密碼身份驗證
使用綁定驗證
綁定身份驗證是使用LDAP對用戶進行身份驗證的最常用機制。在綁定身份驗證中,用戶憑證(即用戶名/密碼)被提交給LDAP服務器,由LDAP服務器對用戶進行身份驗證。使用綁定身份驗證的好處是,用戶的秘密信息(即密碼)不需要暴露給客戶端,這有助于防止它們泄露。
下面是綁定身份驗證配置的示例。
@Bean
BindAuthenticator authenticator(BaseLdapPathContextSource contextSource) {
    BindAuthenticator authenticator = new BindAuthenticator(contextSource);
    authenticator.setUserDnPatterns(new String[] { "uid={0},ou=people" });
    return authenticator;
}

@Bean
LdapAuthenticationProvider authenticationProvider(LdapAuthenticator authenticator) {
    return new LdapAuthenticationProvider(authenticator);
}
這個簡單的示例通過在提供的模式中替換用戶登錄名并嘗試將登錄密碼綁定為該用戶來獲得用戶DN。如果您的所有用戶都存儲在目錄中的單個節點下,那么這是可以的。如果你想要配置一個LDAP搜索過濾器來定位用戶,你可以使用以下方法:
@Bean
BindAuthenticator authenticator(BaseLdapPathContextSource contextSource) {
    String searchBase = "ou=people";
    String filter = "(uid={0})";
    FilterBasedLdapUserSearch search =
        new FilterBasedLdapUserSearch(searchBase, filter, contextSource);
    BindAuthenticator authenticator = new BindAuthenticator(contextSource);
    authenticator.setUserSearch(search);
    return authenticator;
}

@Bean
LdapAuthenticationProvider authenticationProvider(LdapAuthenticator authenticator) {
    return new LdapAuthenticationProvider(authenticator);
}
如果與上面的ContextSource定義一起使用,這將使用(uid={0})作為過濾器在DN ou=people,dc=springframework,dc=org下執行搜索。同樣,用戶登錄名被替換為篩選器名稱中的參數,因此它將搜索uid屬性等于用戶名的條目。如果沒有提供用戶搜索庫,則從根目錄執行搜索。
使用密碼身份驗證
密碼比較是將用戶提供的密碼與存儲在存儲庫中的密碼進行比較。這可以通過檢索密碼屬性的值并在本地進行檢查來完成,也可以通過執行LDAP“比較”操作來完成,在該操作中,將提供的密碼傳遞給服務器進行比較,而永遠不會檢索真正的密碼值。如果密碼用隨機的鹽值正確哈希,則無法進行LDAP比較。
示例:最小密碼比較配置
@Bean
PasswordComparisonAuthenticator authenticator(BaseLdapPathContextSource contextSource) {
    return new PasswordComparisonAuthenticator(contextSource);
}

@Bean
LdapAuthenticationProvider authenticationProvider(LdapAuthenticator authenticator) {
    return new LdapAuthenticationProvider(authenticator);
}
下面是一個更高級的配置,包含一些自定義。
示例:密碼比較配置
@Bean
PasswordComparisonAuthenticator authenticator(BaseLdapPathContextSource contextSource) {
    PasswordComparisonAuthenticator authenticator =
        new PasswordComparisonAuthenticator(contextSource);
    authenticator.setPasswordAttributeName("pwd");
    authenticator.setPasswordEncoder(new BCryptPasswordEncoder());
    return authenticator;
}

@Bean
LdapAuthenticationProvider authenticationProvider(LdapAuthenticator authenticator) {
    return new LdapAuthenticationProvider(authenticator);
}
①指定密碼屬性為pwd
②使用BCryptPasswordEncoder
LdapAuthoritiesPopulator
Spring Security的ldapauthortiespopulator用于確定為用戶返回什么權限。
示例:LdapAuthoritiesPopulator配置
@Bean
LdapAuthoritiesPopulator authorities(BaseLdapPathContextSource contextSource) {
    String groupSearchBase = "";
    DefaultLdapAuthoritiesPopulator authorities =
        new DefaultLdapAuthoritiesPopulator(contextSource, groupSearchBase);
    authorities.setGroupSearchFilter("member={0}");
    return authorities;
}

@Bean
LdapAuthenticationProvider authenticationProvider(LdapAuthenticator authenticator, LdapAuthoritiesPopulator authorities) {
    return new LdapAuthenticationProvider(authenticator, authorities);
}
Active Directory
Active Directory支持它自己的非標準身份驗證選項,并且正常的使用模式不太適合標準
LdapAuthenticationProvider。通常使用域用戶名(格式為user@domain)執行身份驗證,而不是使用LDAP專有名稱。為了簡化這一點,Spring Security提供了一個為典型的Active Directory設置定制的身份驗證提供程序。
配置
ActiveDirectoryLdapAuthenticationProvider非常簡單。您只需要提供域名和提供服務器地址的LDAP URL。下面是一個配置示例:
@Bean
ActiveDirectoryLdapAuthenticationProvider authenticationProvider() {
    return new ActiveDirectoryLdapAuthenticationProvider("example.com", "ldap://company.example.com/");
}
會話管理
HTTP會話相關的功能是通過SessionManagementFilter和
SessionAuthenticationStrategy接口的組合來處理的,該接口由過濾器委托給它。典型的應用包括會話固定保護、攻擊預防、會話超時檢測和限制通過身份驗證的用戶可以同時打開的會話數量。
- 檢測超時
您可以配置Spring Security來檢測無效會話ID的提交,并將用戶重定向到適當的URL。這是通過會話管理元素實現的:
protected void configure(HttpSecurity http) {
  http.sessionManagement().invalidSessionUrl("/invalidSession.htm");
}
注意,如果您使用這種機制來檢測會話超時,如果用戶登出,然后在沒有關閉瀏覽器的情況下重新登錄,它可能會錯誤地報告錯誤。這是因為當您使會話失效時,會話cookie不會被清除,即使用戶已經注銷,它也會被重新提交。你可以在登出時顯式地刪除JSESSIONID cookie,例如在登出處理程序中使用以下語法:
protected void configure(HttpSecurity http) {
  http.logout().deleteCookies("JSESSIONID");
}
不幸的是,這不能保證對每個servlet容器都適用,所以您需要在您的環境中測試它。
如果您在代理服務器后運行應用程序,您還可以通過配置代理服務器來刪除會話cookie。例如,使用Apache HTTPD的mod_headers,下面的指令會在登出請求的響應中使JSESSIONID過期,從而刪除JSESSIONID cookie(假設應用程序部署在路徑為 /tutorial下):
<LocationMatch "/tutorial/logout">
Header always set Set-Cookie "JSESSIONID=;Path=/tutorial;Expires=Thu, 01 Jan 1970 00:00:00 GMT"
</LocationMatch>
- 并發會話控制
如果您希望對單個用戶登錄到您的應用程序的能力進行限制,Spring Security通過以下簡單的附加功能提供了開箱即用的支持。首先,你需要將以下偵聽器添加到你的web.xml文件中,以保持Spring Security關于會話生命周期事件的更新:
<listener>
<listener-class>
    org.springframework.security.web.session.HttpSessionEventPublisher
</listener-class>
</listener>
然后將以下幾行添加到你的應用程序上下文中:
<http>
...
<session-management>
    <concurrency-control max-sessions="1" />
</session-management>
</http>
這將防止用戶多次登錄,第二次登錄將導致第一次登錄無效。通常您希望防止第二次登錄,在這種情況下您可以使用:
<http>
...
<session-management>
    <concurrency-control max-sessions="1" error-if-maximum-exceeded="true" />
</session-management>
</http>
第二次登錄將被拒絕。通過“拒絕”,我們的意思是,如果使用基于表單的登錄,用戶將被發送到
authentication-failure-url。如果第二次身份驗證是通過另一種非交互機制進行的,比如“remember-me”,一個“unauthorized”(401)錯誤將被發送給客戶端。如果希望使用錯誤頁面,可以將屬性session-authentication-error-url添加到會話管理元素。
如果您正在為基于表單的登錄使用自定義身份驗證過濾器,那么您必須顯式地配置并發會話控制支持。
- 會話固定攻擊保護
會話固定攻擊是一個潛在的風險,在這種情況下,惡意攻擊者可能通過訪問一個站點來創建一個會話,然后說服另一個用戶使用相同的會話登錄(例如,通過向他們發送一個包含會話標識符作為參數的鏈接)。Spring Security通過在用戶登錄時創建新會話或更改會話ID來自動防止這種情況發生。如果您不需要這種保護,或者它與其他一些需求沖突,您可以使用<session-management>上的
session-fixation-protection屬性來控制行為,該屬性有四個選項:
- none:不做任何事。原會話將保留。
- newSession:創建一個新的“干凈”會話,而不復制現有的會話數據(與Spring security相關的屬性仍將被復制)。
- migrateSession:創建一個新會話,并將所有現有會話屬性復制到新會話。這是Servlet 3.0或舊容器的默認設置。
- changeSessionId:不要創建新的會話。相反,使用Servlet容器提供的會話固定保護(HttpServletRequest#changeSessionId())。這個選項只在Servlet 3.1 (Java EE 7)和更新的容器中可用。在舊容器中指定它將導致異常。這是Servlet 3.1和更新容器中的默認值。
當會話固定保護發生時,它會導致在應用程序上下文中發布
SessionFixationProtectionEvent。如果您使用changeSessionId,此保護也將導致任何javax.servlet.http. httpessionidlistener被通知,所以如果您的代碼偵聽這兩個事件,請謹慎使用。
- SessionManagementFilter
SessionManagementFilter檢查SecurityContextRepository的內容和反對的當前SecurityContextHolder內容是否在當前請求用戶已經通過身份驗證,通常由非交互式驗證機制,如pre-authentication或remember-me。如果存儲庫包含安全上下文,則過濾器不執行任何操作。如果沒有,并且本地線程SecurityContext包含一個(非匿名的)Authentication對象,那么過濾器假定它們已經通過堆棧中先前的過濾器進行了身份驗證。然后它將調用已配置的
SessionAuthenticationStrategy。
如果用戶當前沒有經過身份驗證,該過濾器將檢查是否請求了一個無效的會話ID(例如,由于超時),并將調用配置的InvalidSessionStrategy(如果設置了一個)。最常見的行為就是重定向到一個固定的URL,這被封裝在標準實現
SimpleRedirectInvalidSessionStrategy中。
- SessionAuthenticationStrategy
SessionAuthenticationStrategy被SessionManagementFilter和AbstractAuthenticationProcessingFilter使用,所以如果你使用一個定制的表單登錄類,例如,你將需要將它注入到這兩個類中。在這種情況下,結合命名空間和自定義bean的典型配置可能是這樣的:
<http>
<custom-filter position="FORM_LOGIN_FILTER" ref="myAuthFilter" />
<session-management session-authentication-strategy-ref="sas"/>
</http>

<beans:bean id="myAuthFilter" class=
"org.springframework.security.web.authentication.UsernamePasswordAuthenticationFilter">
    <beans:property name="sessionAuthenticationStrategy" ref="sas" />
    ...
</beans:bean>

<beans:bean id="sas" class=
"org.springframework.security.web.authentication.session.SessionFixationProtectionStrategy" />
請注意,如果您將bean存儲在實現httpessionbindinglistener的會話中(包括Spring會話范圍內的bean),使用缺省的
SessionFixationProtectionStrategy可能會導致問題。有關這個類的更多信息,請參閱Javadoc。
- Concurrency Control
Spring Security能夠防止主體對同一應用程序的并發身份驗證次數超過指定的次數。許多isv利用這一點來實施許可,而網絡管理員喜歡這個特性,因為它有助于防止人們共享登錄名。例如,您可以阻止用戶“Batman”從兩個不同的會話登錄到web應用程序。您可以使他們之前的登錄失效,也可以在他們試圖再次登錄時報告錯誤,以防止第二次登錄。注意,如果您使用第二種方法,沒有顯式登出的用戶(例如,剛剛關閉瀏覽器的用戶)將不能再次登錄,直到原始會話過期。
命名空間支持并發控制,因此請檢查前面的命名空間章節以獲得最簡單的配置。但有時你需要定制一些東西。
該實現使用了
SessionAuthenticationStrategy的一個特殊版本,稱為ConcurrentSessionControlAuthenticationStrategy。
以前,并發身份驗證檢查是由ProviderManager進行的,它可以被注入一個
ConcurrentSessionController。后者將檢查用戶是否試圖超過允許的會話數。但是,這種方法要求預先創建HTTP會話,這是不可取的。在Spring Security 3中,用戶首先通過AuthenticationManager進行身份驗證,一旦驗證成功,將創建一個會話,并檢查是否允許打開另一個會話。


