Nginx在絕大數的場景中我們使用其用于做web中間件或反向代理使用,但是nginx實際上也提供了正向代理的功能。下面我們來進行nginx正向代理配置操作,以便大家能夠掌握nginx正向代理配置方法。
第一步:獲取nginx正向代理模塊
git clone

https://github.com/chobits/ngx_http_proxy_connect_module
第二步:下載nginx源碼包
wget http://nginx.org/download/nginx-1.9.12.tar.gz
tar xf nginx-1.9.12.tar.gz
第三步:通過補丁方法把上述下載的正向代理模塊導入到nginx模塊存儲目錄
cd nginx-1.9.12/
patch -p1 <
/root/ngx_http_proxy_connect_module/patch/proxy_connect.patch
第四步:編譯安裝nginx
 yum -y install openssl-devel zlib-devel prce-devel
 ./configure
 --add-dynamic-module=/root/ngx_http_proxy_connect_module
make && make install
第五步:配置所允許通過代理主機的主機列表
 cat /usr/local/nginx/conf/client-allow.conf
allow 127.0.0.1;
allow 192.168.216.1;
allow 192.168.216.185;
第六步:修改nginx配置文件
 cat /usr/local/nginx/conf/nginx.conf

user  nobody;
worker_processes  1;

error_log  logs/error.log;
error_log  logs/error.log  notice;
error_log  logs/error.log  info;

pid        logs/nginx.pid;


load_module /usr/local/nginx/modules/ngx_http_proxy_connect_module.so; #位置注意

events {
    worker_connections  1024;
}


http {
    include       mime.types;
    default_type  Application/octet-stream;

    log_format  main  '$remote_addr - $remote_user [$time_local] "$request" '
                      '$status $body_bytes_sent "$http_referer" '
                      '"$http_user_agent" "$http_x_forwarded_for"';

    access_log  logs/access.log  main;

    sendfile        on;
    tcp_nopush     on;

    keepalive_timeout  0;
    keepalive_timeout  65;

    gzip  on;

    server {
        listen       8080; #代理端口
        resolver        119.29.29.29; #域名解析服務器
        proxy_connect;
        proxy_connect_allow     443 563;
        proxy_connect_connect_timeout   10s;
        proxy_connect_read_timeout      10s;
        proxy_connect_send_timeout      10s;

        location / {
            proxy_pass  http://$host;
            proxy_set_header Host $host;
        }
        include client-allow.conf; #主機白名單
        deny all; #除了主機白名單中的主機,拒絕所有

        error_page  404              /404.html;

         redirect server error pages to the static page /50x.html

        error_page   500 502 503 504  /50x.html;
        location = /50x.html {
            root   html;
        }

         proxy the php scripts to Apache listening on 127.0.0.1:80

        location ~ .php$ {
            proxy_pass   http://127.0.0.1;
        }

         pass the PHP scripts to FastCGI server listening on 127.0.0.1:9000

        location ~ .php$ {
            root           html;
            fastcgi_pass   127.0.0.1:9000;
            fastcgi_index  index.php;
            fastcgi_param  SCRIPT_FILENAME  /scripts$fastcgi_script_name;
            include        fastcgi_params;
        }

         deny access to .htaccess files, if Apache's document root
         concurs with nginx's one

        location ~ /.ht {
            deny  all;
        }
    }


     another virtual host using mix of IP-, name-, and port-based configuration

    server {
        listen       8000;
        listen       somename:8080;
        server_name  somename  alias  another.alias;

        location / {
            root   html;
            index  index.html index.htm;
        }
    }


     HTTPS server

    server {
        listen       443 ssl;
        server_name  localhost;

        ssl_certificate      cert.pem;
        ssl_certificate_key  cert.key;
        ssl_session_cache    shared:SSL:1m;
        ssl_session_timeout  5m;

       ssl_ciphers  HIGH:!aNULL:!MD5;
        ssl_prefer_server_ciphers  on;

        location / {
            root   html;
            index  index.html index.htm;
    }
    }

}
第七步:檢查并啟動nginx服務
/usr/local/nginx/sbin/nginx -t #檢查配置文件

/usr/local/nginx/sbin/nginx # 啟動服務

/usr/local/nginx/sbin/nginx -s stop #關閉

/usr/local/nginx/sbin/nginx -s reload #重啟加載配置文件

ss -anput | grep ":8080" #檢查端口
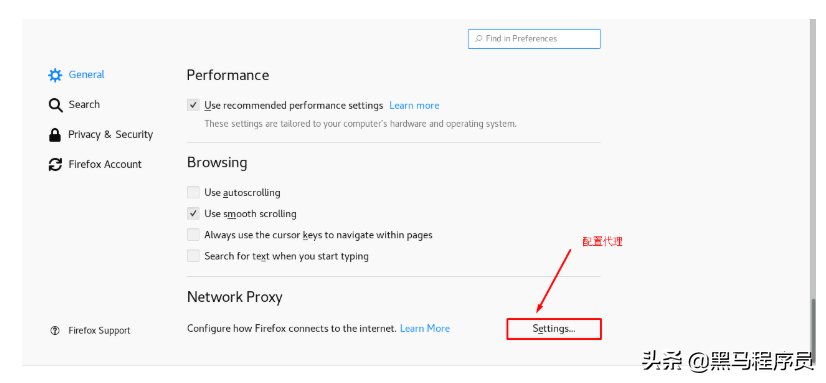
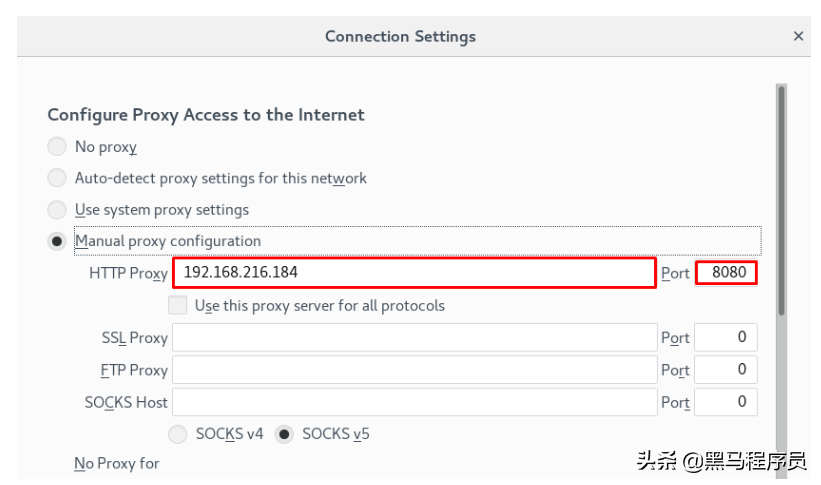
第八步:被代理主機配置


第九步:被代理主機驗證nginx正向代理可用性
ss -anput | grep ":8080"

tcp LISTEN 0 128 *:8080 *:* users:(("nginx",pid=19515,fd=6),("nginx",pid=19514,fd=6))

tcp ESTAB 0 0 192.168.216.184:8080 192.168.216.185:35718 users:(("nginx",pid=19515,fd=11))

tcp ESTAB 0 0 192.168.216.184:8080 192.168.216.185:35712 users:(("nginx",pid=19515,fd=3))
建議關注收藏,沒事可以過來找找有用的文章哦。


